Monday, June 11, 2012

Fan Box

Hello friends,
Today I thought I'd show something different!
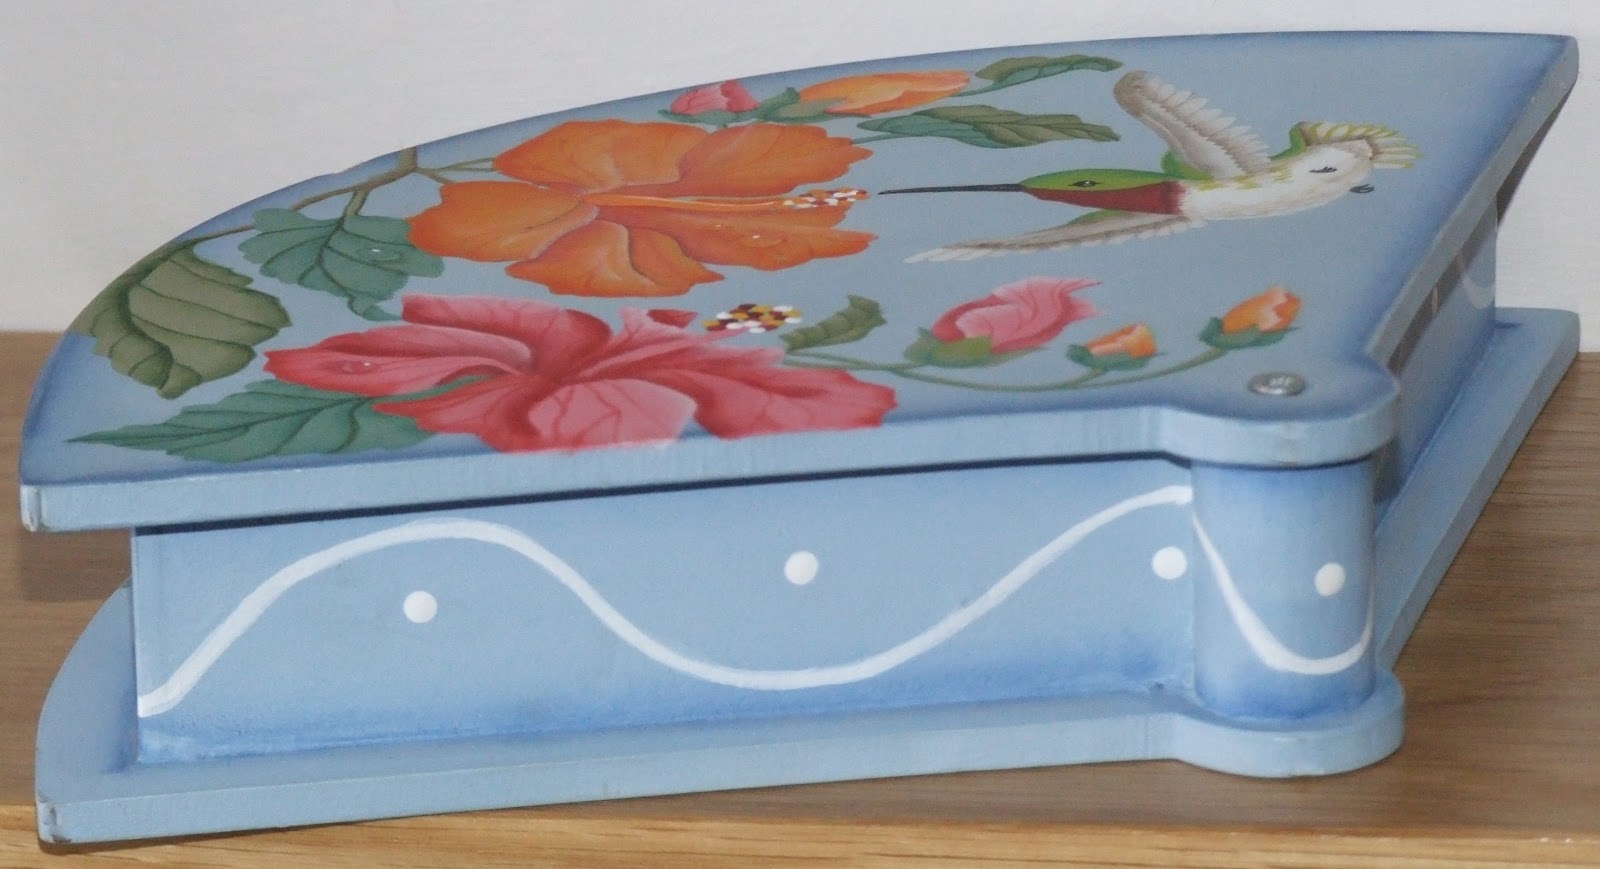
I use to go to a decorative painting class and this is one of the projects that we did.  The class was run by a wonderful lady called Cathrine and she had the boxes made.  The paint that I used is the Deco Art Americana Acrylics and the image was also supplied by Cathrine.  The raindrops on the petals and leaf don't really show up that well in the photos but they do look as if water has been dropped onto the top of the box in real life.  I was really pleased with the way this turned out.  My box is full to the brim with all sorts of bits and pieces and it's not all craft either!!!
I hope that you like it and feel free to comment, Thanks for stopping by.
Caz xxx


Monday, May 14, 2012

Especially for You

Hello Friends,
I got a Forever Friends 3D motif of the ballet bear in my craft stash and designed my card around it.  I covered the card with pink embossed paper on the front and inside (the embossed pattern is of layered hearts at random angles).  I cut two deckle ovals from white card and inked around the edge of both with tattered rose distress ink while still in the die.  I attached one to the front of the card and the other inside for the sentiment to be wrote on.  I attached the bear to the front oval and used silver peel offs to frame it as shown.   I cut four corners from the spellbinders Flourish accent in white card and again inked them all while still in the die with the tattered rose distress ink, attached with glue as shown.  I also cut two of the long design from the same set and inked while still in the die with tattered rose.  These were attached to the oval inside the card for added decoration. Sorry there's no picture.
Hope you like it and thanks for stopping by
Caz xxx

Sunday, May 13, 2012

Spirelli

Hello friends,
Some quick baby cards using spirelli, silver metallic thread and various frames and images.
 The top two are for the girls, the first one is with an oval spirelli  template and 15 points have been skipped to create a small circle in the middle.  A narrow silver border frames it and a fancy corner punch used on the bottom corners.  The birds are glued on and the fairy girl is attached with foam pads. 


This one is with a spirelli flower punch and 6 petals have been skipped.  I've used the negative that the frames were in and punched the corners.  The image was attached with foam pads.


The bottom three are for the boys. 
 
10 points have been skipped on this round template and then placed back in the negative of a different coloured card, the corners have been punched and the mini 3D images have been attached with foam pads.


Again using the spirelli flower punch, 5 petals have been skipped to create a larger opening and the images are attached with foam pads.  A narrow silver border finishes the card.


The silver negative from the borders has been used and the corners punched to cover the card front.
15 points have been skipped  to create the pattern and the mini 3D image is attached with foam pads. 
 Hope you like them and thanks for stopping by
Caz xxx


Saturday, May 12, 2012

From the Three of us

Hello friends,
Today I thought I'd do a cross stitch card.  The pattern is from one of the cross stitch magazines (sorry I can't remember which one but I think it was from last year).  I had already stitched the design previously and just added the sentiment underneth.  I've used a landscape tri fold aperture to frame the stitching and covered the inside back of the card with some light purple embossed paper, I also cut a deckled oval, inked around the edge with milled lavender distress ink while still in the die and glued to the centre of the purple.  To finish I coloured some small gem stones with amethyst promarker and adhered to the top right corner when dry.  Sorry theres no photo of the inside, the card has already been sent.  Hope you like it and thanks for stopping by
Caz xxx
 

Friday, May 11, 2012

Wedding Bells

Hello Friends,
Today is a gate fold card kit by Kameo Cards, the kit includes the card, and both the silver and white deckle edge rectangle mats.
The two papers and the vellum picture are also by Kameo card.  One of the papers matches the vellum picture and the other is a nice patterned paper that compliments the the other.  I cut a wide strip of the patterned and two smaller strips of the bell papers and glued them around the centre of the card, also using silver peel off borders to define them.  Using a self adhesive sheet, I trimmed around the vellum picture and adhered it to the white deckle edge mat, matted to silver using foam pads and then to the card.  I printed a sentiment onto white paper for the insert and finished it with a decorative border punch on alternate corners.  Hope you like it and thanks for stopping by   
Caz xxx


Thursday, May 10, 2012

A bumper kit of Pyramage and Invertage part 4

Hello friends,
I've taken a card from that bumper kit again and removed the picture leaving the border to give me an aperture card. 


I've covered the inside front and back of the card with pink to match the border on the front, I've also used a piece of the inset papers that match the design of the card to mat on the inside back.  I cut a circle using the Heartfelt creations scalloped posy die set in pink and placed in the centre of the aperture,  I cut two of the large Moroccan motifs in white and offset them.  I gave three flowers from the Craftwork cards a bit of a curl on each petal and glued together with a card candi in the middle, this was glued in the middle with a leaf sprig from my stash.  I cut four corners each of pink and white card from the moroccan accents, placed the white on top of the pink and laced together.  I glued these to the top left and bottom right of both the front and inside back of the card.  I hope you like it and thanks for stopping by
Caz xxx

Wednesday, May 9, 2012

Blue Iris

Hello crafty friends,
This is just a quick card.
The paper and vellum's used are by Kameo cards. I covered the card front with pale blue check paper. I cut a strip of silver patterned vellum with a little wavy edge on both sides and matted on white card (with double sided adhesive sheet) also giving it a wavy edge. I took the vellum Iris panel and  using double sided self adhesive sheet, placed it onto white card, cut around the frame and placed it onto the card front with foam pads for a little bit of dimension. Hope you like it.
Thanks for stopping by.
Caz xxx

Tuesday, May 8, 2012

Bunny Arch

Hello friends,
I really need to practice with this layered scalloped posy die from Heartfelt Creations.
Using a red A6 pearlesent card, I tried to cut the posy half circle at the top of the card (mine turned out a little lopsided).  I matted a piece of cream pearlesent paper which I used a fancy corner punch on, below the fretwork arch leaving a small border.  Using the same paper, I glued it behind the arch and trimmed following the shape, also to the inside back of the card with the corners punched to match the front.  I also glued a piece of red pearlesent paper to the inside front to hide the back of the cream that I'd glued to the arch, again trimming round.  I cut the flowers in the same two pearlesent papers and slightly shaped them on my rubber mat using a medium ball tool.  I cut the vines in two different green pearlesent papers using both vine dies in the decorative Chateau gate set, again from Heartfelt Creations and arranged them up the left side and along the top of the card.  I glued the flowers in place and added yellow liquid pearls to their centres.  I cut round the rabbit from Craftwork cards and used vanilla promarker to take the white edge away around the rabbit and flower and a red promarker to recolour the petals, attached using foam pads after shaping slightly.  I had fun making this card, hope you like it and thanks for stopping by
Caz xxx


Monday, May 7, 2012

Black & white

Hello friends,
I took an A5 card and attached a matted layer of black, white, black leaving a small border each time.  I also pierced the edge of the white mat.
  I cut the lace border from the Heartfelt Creations die and threaded the organza ribbon through it before attaching to the card.  I made a double bow from the ribbon, glued in place and attached a silver star button to its middle.  I embossed white card with the vintage dressmaker folder by Couture creations (love this folder), lightly rubbed versamark over it and dusted with pewter perfect pearls, then cut round the image.  Gave it some shape and attached with foam pads. 
I hope you like it and thanks for stopping by
Caz xxx

Sunday, May 6, 2012

A bumper kit of Pyramage and Invertage part 3

Hello friends,
today's card is the one that was left to one side after I removed the flower picture from it in yesterdays post. 
I removed the flower panel from the front of the card (again to be used on a different card) but left the fancy trim.  I used Tim Holtz distress core'dinations in a purple/ lavender colour to cover the inside front of the card.  I embossed this with the vintage dressmaker folder by Couture creations and sanded the image on both sides, then glued to the inside front.  I covered the inside back with DCWV Rock star paper for a rock chick look.  I cut three of the daisy flower from the tattered flowers die by Tim Holtz in a lavender crinkle paper and then spritzed them with a couple of mica sprays and left them to dry.  I took two different white flowers, 3 of each, that I found in my stash and used them to clean my mat from the mica sprays, again leaving to dry.
Using one of the dies from the Spellbinders Peony collection, I cut and embossed on some lilac card and while still in the die, inked round the edge with the milled lavender distress ink.  I stamped my sentiment in the middle with  evergreen bough distress ink from the winter collection and attached to the inside back of the card, making sure that it didn't peep out from the cut away front.  I placed the daisy flowers on top of each other, off centering them and securing with a metallic pink brad I glued this to the bottom of the card on the right side.  Hope you like it and thanks for stopping by 
Caz xxx

Saturday, May 5, 2012

A bumper kit of Pyramage and Invertage part 2

Hello crafty friends,
For this card, I've used the same kit and card design as the card that I posted yesterday.
 I started by removing the flower picture (to be used) and leaving the narrow border in place,  then placed it on one side as it's not being used for this card today. 
Using an A5 card, I drew around the outside of the flower picture, opening the card out on the cutting mat, using a metal  edge ruler and a craft knife, I cut the aperture.  I covered the inside back with two different pieces of the insert papers and then covered the front using the same papers and lined them up with the inside of the back through the aperture window, again turning over on the cutting mat and cutting the aperture back in.  I covered the inside front of the card (if that makes sense) with black thin card, I also matted the flower picture onto the same black card.  Using the invertage pieces, I decided on how many to use on the matted design (in this case one), foam pads to attach and lined it up with the design. The next one was glued inside the aperture on the front to the black card that was applied to the back of it and then the smaller aperture cut back in so that the front now has a smaller aperture (sorry, a bit long winded there).  It now looks that only a small aperture was cut.  I cut three Moroccan accent borders in black and two in pink. The black borders were placed around the outside edge of the flower picture creating a frame and the pink ones created a frame around the small aperture on the inside front, I also used the left over black border to hide where the two papers meet in the inside back of the card and placed the flower picture by lining the image up from the front.
The card was finished by placing the rest of the invertage on the front of the card.
Hope you like it and thanks for stopping by
Caz xxx


Friday, May 4, 2012

A bumper kit of Pyramage and Invertage

Hello crafty friends,
My dear belated husband gave me this kit as a sort of get well present one year instead of a bunch of flowers, as they would have made me worse at the time.  That was more than a just few years ago now.  If I remember right, I think that it was a C&C kit.  It got packed away along with all my other craft stuff and I just focused on the boys and myself getting through the day, one day at a time, that is until now, time to move on.
The cards in the kit are all square pre-printed flower theme designs (like the one in the next picture and theres 20 designs, 2 of each) so that you build the pyramage on one and the invertage onto the other, theres also a  great selection of patterned insert papers in various colours and a sheet of stickers too that match the card designs (as laid out above).  I like to play with the cards rather than use them as they are intended!
 Using a craft knife and metal edge ruler, I cut the flower picture out the middle leaving the thin border in place and matted it onto gold mirri card, I covered the inside of the card on both sides also with gold mirri.  I turned the card over onto the front so that I could cut the aperture back in, then using one of the patterned inserts, I made a mat on top of the mirri on both sides and again turned over to cut the aperture back in.  I placed the flower picture inside the card on the back, making sure it aligned with the aperture and stuck it down.  Opening the card out, I built up the layers of pyramage.  Hope you like it and thanks for stopping by.
Caz xxx

Friday, April 20, 2012

Hoppy Easter


Hello Blog land
I made this for my sister.
I used a square card that has a hexagon type shape cut in the centre with the inner still in it, it also came with the shapes that I've used for petals around the edge of the aperture.  I've also used a Fiskers hand punch of the butterfly in the centre of each petal at a slight angle.
 The rabbit holding the egg is a topper by Craftwork cards which I've coloured using Promarkers and the red tulip paper is from my craft stash.  I've also used this paper to cover the inside of the card and used the inner from the aperture as a mat for my sentiment, and a few butterflies from the punch outs (which are only just visible on the topper and the top right of the card), I added some red Stickles down their centre.  A square piece of green card was added to the inner back to hide the mess of the petals and topper.
Thanks for stopping by
Caz xxx

Thursday, April 19, 2012

Mother's Day

Hello,
This is the card that my youngest son made for me at school for Mother's Day.  The children were given a template to draw around and they had to chose their own papers.  He has cut it out and mounted it all himself and chose and added the embellishments, he was a little upset when he gave it me as he said the tinsel glitter went wrong on it.  I am so proud of him and I think that he has done an amazing job.
Thanks for stopping by
Caz xxx

Wednesday, April 18, 2012

King Tutankhamun

Hello everyone from a very rainy Nottingham,
I hope the weather is better where you are!
  I made this card for my youngest son to give to his brother, he chose the theme himself.
I've used a black A4 size card (A3 folded in half), King Tutankhamun - the Golden Age topper (this topper is highly gold foiled with shades of turquoise and green around his head dress, black behind him and a stone effect border with hieroglyphics framing him, it's not far of A5 in size, so it's quite a large topper).  The photo here does not do it justice.  It's by Kanban as are the Pearlised printed papers, Basket weave adhesive texture sheet, black Lastra card, Foiled adhesive borders and ribbons.  I've also used Gold peel off corners on the Lastra card under the topper and for framing my sentiment.  The sentiment was cut from the turquoise basket weave sheet using Tim Holtz Upon a time die.
This card is very bright with all that Foil.  I know that male cards can be difficult to make and even I struggle for inspiration, but with having three boys myself then I have to come up with something that they will not only love to receive but also to give to their friends.
Thanks for stopping by Caz xxx

Tuesday, April 17, 2012

Chief Sitting Bull

Hello Bloggers,
I made this card for my second son to give to his brother.  He chose the theme and certain areas of the card stock to be used himself.
I've used a Kanban kit which included the cream foiled stitch effect card (I cut this pre-scored card in half and used both pieces down the right side leaving a gap in the middle), Buffalo Hide background card down the other side (this is where my son got picky about where the card was cut for that certain part used), Teepee Leather background card is used to fill the gap in the middle of the cream stitch and also for the lettering and numbers used in the sentiment.  The toppers are Spirit of the Land and Great Plain Warriors (they both have a beautiful red foil distressed border around them), the toppers were mounted on Bronze/copper colour texture foil card as was the leather strip in the middle of the cream, a Navajo Tribe foil ribbon is used down the entire length of the card.  The lettering and numbers
 was cut using the Quickcuts Mini Marisa Upper case dies and Tim Holtz Word Play die.
I love this card, I have already used this kit before to make a card (a smaller one than this) for my Dad who really loved it and said that it brought back happy memories.  Thanks for stopping by Caz xxx

Monday, April 16, 2012

My Son's 18th

Hi and welcome,
After alot of messing around with the camera, I've finally been able to get a couple of photos of the card I made for my son. 
He loves all types of rock music and with our very British weather... well what else could I do lol.
I've used DCWV from their Rockstar stack 8x8, Kanban's holographic Chic Dots, Silver Miri card, Black Velvet Ric-rac Ribbon from American Crafts and a piece of distressed gloss card from my own craft stash.  I've also used an A4 white card (A3 folded in half), Tim Holtz Word Play and Umbrella Man Dies, Spellbinders
Grand Squares and Decaled Ovals  Dies, and M-bossabillity So Trendy and another embossing folder.  The So Trendy embossing is not showing up to great in the photo on the distressed background behind the umbrella man. 
My son just loves this card and laughed at the umbrella man. 
Thanks for looking
Caz xxx


Sunday, April 15, 2012

Hi and welcome to my blog

Good afternoon blog land,
This is my first post and I'm hoping to post a picture of a card later today,  if I can get the camera working that is...

My name is Carolyn or Caz (thats what my dear belated husband  Phil called me), I started work at 16 in the rag trade working for some of the top designers that dressed the Royals, mainly the females and sometimes the children.  Everthing had to be spot on so to speak, no room for mistakes, faults or flaws, perfection was the name of the game lol.
I'm a widow with three wonderful boys, the eldest has just turned 18, the second one is 15 (16 in May), and the youngest is 11.  They are true to the rhyme... slugs and snails ect, they are very rough and tumble ( but gentle too) and the washing machine is used every night, but life is never dull with them around lol.

Well thats all for now, will try the camera and see if I can post a pic of the cards I made for my son's 18th.
Please feel free to leave a message or you can email me, thanks for visiting...
Caz xxx